标签: code

  • 【Python】使用cwebp、gif2webp、exiftool实现保留exif信息的WebP转换

    此前写了个使用cwebp、gif2webp的脚本,但是由于cwebp目前在win的元数据提取存在问题,因此我们可以使用已经支持exif提取和写入的exiftool进行最后一步的转换,这样我们的图片压缩、转码都在官方库得以实现。

    前置条件:

    cwebp、gif2webp、exiftool三个组件都注册到系统环境变量。python则使用pil库用于分辨率获取。

    实现效果:

    使用pil库对分辨率进行获取,但是不介入压缩过程,因为cwebp目前没法获取图片分辨率,使用pil库进行是否执行resize的判断。

    使用cwebp处理静态png、jpg,使用gif2webp处理gif图,启用mt多线程,压缩质量85,resize到2560最长、宽边,exiftool采用”-overwrite_original”来避免生成两个图片。

    测试效果:

    该图片原图7M多,压缩质量选择85,可能由于细节较为丰富,压缩到WebP大小仍为1M左右,还是比较大,不过细节保留充分,同时保留了EXIF信息。

    import tkinter as tk
    from tkinter import filedialog, messagebox
    import os
    import subprocess
    from PIL import Image
    
    def validate_file(input_path):
        input_path = os.path.abspath(input_path)
        if not os.path.exists(input_path):
            raise FileNotFoundError(f"文件 {input_path} 不存在,请检查路径。")
        return input_path
    
    def get_resized_dimensions(width, height, max_size):
        if width > height:
            new_width = max_size
            new_height = int((new_width / width) * height)
        else:
            new_height = max_size
            new_width = int((new_height / height) * width)
        return new_width, new_height
    
    def convert_image(input_path, output_path, new_width=None, new_height=None):
        try:
            file_extension = os.path.splitext(input_path)[1].lower()
            if file_extension == ".gif":
                command = ["gif2webp","mt", input_path, "-o", output_path]
            else:
                if new_width and new_height:
                    command = ["cwebp","mt", "-q", "85", "-resize", str(new_width), str(new_height), input_path, "-o", output_path]
                else:
                    command = ["cwebp","mt", "-q", "85", input_path, "-o", output_path]
            subprocess.run(command, check=True)
        except subprocess.CalledProcessError as e:
            raise RuntimeError(f"转换工具运行出错: {e}")
    
    def embed_exif(input_path, output_path):
        try:
            command = ["exiftool", "-overwrite_original", "-tagsfromfile", input_path, "-all:all", output_path]
            subprocess.run(command, check=True)
        except subprocess.CalledProcessError as e:
            raise RuntimeError(f"EXIF 数据嵌入失败: {e}")
    
    def convert_to_webp(input_path, max_size=2560):
        try:
            # 验证文件路径
            input_path = validate_file(input_path)
            output_path = os.path.splitext(input_path)[0] + ".webp"
    
            # 使用 PIL 获取图像分辨率
            with Image.open(input_path) as img:
                width, height = img.size
                if width <= max_size and height <= max_size:
                    convert_image(input_path, output_path)
                else:
                    new_width, new_height = get_resized_dimensions(width, height, max_size)
                    convert_image(input_path, output_path, new_width, new_height)
    
            # 嵌入 EXIF 数据
            embed_exif(input_path, output_path)
    
            return f"图片已转换并保存为 {output_path}"
    
        except (subprocess.CalledProcessError, FileNotFoundError) as e:
            return str(e)
        except Exception as e:
            return f"处理文件时发生错误: {e}"
    
    def select_files():
        file_paths = filedialog.askopenfilenames(
            title="选择图片文件",
            filetypes=[("*所有图片格式", "*.jpg;*.jpeg;*.png;*.gif"),
                       ("JPEG 图片", "*.jpg;*.jpeg"),
                       ("PNG 图片", "*.png"),
                       ("GIF 图片", "*.gif")]
        )
        if file_paths:
            for path in file_paths:
                file_listbox.insert(tk.END, path)
    
    def convert_and_save_batch():
        files = file_listbox.get(0, tk.END)
        if not files:
            messagebox.showerror("错误", "请选择至少一个图片文件!")
            return
    
        results = [convert_to_webp(file_path) for file_path in files]
        messagebox.showinfo("完成", "\n".join(results))
    
    def clear_list():
        file_listbox.delete(0, tk.END)
    
    root = tk.Tk()
    root.title("批量图片转换为 WebP 工具")
    root.geometry("600x400")
    
    frame = tk.Frame(root)
    frame.pack(pady=10, padx=10, fill=tk.BOTH, expand=True)
    
    scrollbar = tk.Scrollbar(frame, orient=tk.VERTICAL)
    file_listbox = tk.Listbox(frame, selectmode=tk.EXTENDED, yscrollcommand=scrollbar.set)
    scrollbar.config(command=file_listbox.yview)
    scrollbar.pack(side=tk.RIGHT, fill=tk.Y)
    file_listbox.pack(side=tk.LEFT, fill=tk.BOTH, expand=True)
    
    button_frame = tk.Frame(root)
    button_frame.pack(pady=10)
    
    select_button = tk.Button(button_frame, text="选择文件", command=select_files, width=15)
    select_button.grid(row=0, column=0, padx=5)
    
    clear_button = tk.Button(button_frame, text="清空列表", command=clear_list, width=15)
    clear_button.grid(row=0, column=1, padx=5)
    
    convert_button = tk.Button(button_frame, text="批量转换", command=convert_and_save_batch, width=15)
    convert_button.grid(row=0, column=2, padx=5)
    
    root.mainloop()
    
  • 【Python】使用WebP官方库进行WebP转换

    此前的代码使用了Pillow库集成的库,这次使用WebP官方库,对GIF、PNG的处理也比较友好。需要添加WebP的库到系统环境变量后使用。

    功能实现:

    代码使用cwebp、gif2webp两种方式转换不同的格式图片,使用库本身的压缩分辨率方法,压缩图片到2560最长、宽。

    对于gif,该代码可以实现对原图动态的保持,此前使用pillow库则可以设定gif的持续或者最后一帧静帧。

    遗憾:

    没有能够传递exif,win平台中cwebp压根没法有效传递exif信息,显示——Warning: only ICC profile extraction is currently supported on this platform!元数据只有ICC才能支持传递,所以只依靠cwebp是没法很好在win中进行转换的。

    这个问题采用exiftool进行了解决,下篇文章可以看到。

    import tkinter as tk
    from tkinter import filedialog, messagebox
    import os
    import subprocess
    from PIL import Image
    
    def validate_file(input_path):
        input_path = os.path.abspath(input_path)
        if not os.path.exists(input_path):
            raise FileNotFoundError(f"文件 {input_path} 不存在,请检查路径。")
        return input_path
    
    def get_resized_dimensions(width, height, max_size):
        if width > height:
            new_width = max_size
            new_height = int((new_width / width) * height)
        else:
            new_height = max_size
            new_width = int((new_height / height) * width)
        return new_width, new_height
    
    # 使用 cwebp 或 gif2webp 进行转换
    def convert_image(input_path, output_path, new_width=None, new_height=None, cwebp_metadata="none", gif2webp_metadata="none"):
        try:
            file_extension = os.path.splitext(input_path)[1].lower()
            if file_extension == ".gif":
                command = ["gif2webp", "-metadata", gif2webp_metadata, "-mt", input_path, "-o", output_path]
            else:
                if new_width and new_height:
                    command = ["cwebp", "-q", "85", "-resize", str(new_width), str(new_height), "-metadata", cwebp_metadata, "-mt", input_path, "-o", output_path]
                else:
                    command = ["cwebp", "-q", "85", "-metadata", cwebp_metadata, "-mt", input_path, "-o", output_path]
            subprocess.run(command, check=True)
        except subprocess.CalledProcessError as e:
            raise RuntimeError(f"转换工具运行出错: {e}")
    
    def convert_to_webp(input_path, max_size=2560, cwebp_metadata="none", gif2webp_metadata="none"):
        try:
            # 验证文件路径
            input_path = validate_file(input_path)
            output_path = os.path.splitext(input_path)[0] + ".webp"
    
            # 使用 PIL 获取图像分辨率
            with Image.open(input_path) as img:
                width, height = img.size
                if width <= max_size and height <= max_size:
                    convert_image(input_path, output_path, cwebp_metadata=cwebp_metadata, gif2webp_metadata=gif2webp_metadata)
                else:
                    new_width, new_height = get_resized_dimensions(width, height, max_size)
                    convert_image(input_path, output_path, new_width, new_height, cwebp_metadata=cwebp_metadata, gif2webp_metadata=gif2webp_metadata)
    
            return f"图片已转换并保存为 {output_path}"
    
        except (subprocess.CalledProcessError, FileNotFoundError) as e:
            return str(e)
        except Exception as e:
            return f"处理文件时发生错误: {e}"
    
    def select_files():
        file_paths = filedialog.askopenfilenames(
            title="选择图片文件",
            filetypes=[("*所有图片格式", "*.jpg;*.jpeg;*.png;*.gif"),
                       ("JPEG 图片", "*.jpg;*.jpeg"),
                       ("PNG 图片", "*.png"),
                       ("GIF 图片", "*.gif")]
        )
        if file_paths:
            for path in file_paths:
                file_listbox.insert(tk.END, path)
    
    def convert_and_save_batch():
        files = file_listbox.get(0, tk.END)
        if not files:
            messagebox.showerror("错误", "请选择至少一个图片文件!")
            return
    
        cwebp_metadata = "exif"  # 设置cwebp要复制的元数据类型为exif
        gif2webp_metadata = "xmp"  # 设置gif2webp要复制的元数据类型为xmp
        results = [convert_to_webp(file_path, cwebp_metadata=cwebp_metadata, gif2webp_metadata=gif2webp_metadata) for file_path in files]
        messagebox.showinfo("完成", "\n".join(results))
    
    def clear_list():
        file_listbox.delete(0, tk.END)
    
    # 创建主窗口
    root = tk.Tk()
    root.title("批量图片转换为 WebP 工具")
    root.geometry("600x400")
    
    frame = tk.Frame(root)
    frame.pack(pady=10, padx=10, fill=tk.BOTH, expand=True)
    
    scrollbar = tk.Scrollbar(frame, orient=tk.VERTICAL)
    file_listbox = tk.Listbox(frame, selectmode=tk.EXTENDED, yscrollcommand=scrollbar.set)
    scrollbar.config(command=file_listbox.yview)
    scrollbar.pack(side=tk.RIGHT, fill=tk.Y)
    file_listbox.pack(side=tk.LEFT, fill=tk.BOTH, expand=True)
    
    button_frame = tk.Frame(root)
    button_frame.pack(pady=10)
    
    select_button = tk.Button(button_frame, text="选择文件", command=select_files, width=15)
    select_button.grid(row=0, column=0, padx=5)
    
    clear_button = tk.Button(button_frame, text="清空列表", command=clear_list, width=15)
    clear_button.grid(row=0, column=1, padx=5)
    
    convert_button = tk.Button(button_frame, text="批量转换", command=convert_and_save_batch, width=15)
    convert_button.grid(row=0, column=2, padx=5)
    
    root.mainloop()
    
  • 【Python】使用PIL库进行多格式批量转换WebP并压缩分辨率

    网站将逐步切换到WebP格式图片,今天捣鼓了插件在服务器端替换图片,但WP的媒体库却怎么都搞不定了,媒体库会自动生成很多缩略图用于不同的场景,我不想碰它的缩略图生成效果,因此只写单一的转换代码是没法做出完整的效果的。

    退而求其次使用本地对图片进行处理,该脚本使用PIL库,图片分辨率限制为2560最长/宽,可以处理带透明通道的图片,也可以处理GIF,用下来效果还不错。

    1月8日更新:

    【Python】使用WebP官方库进行WebP转换
    【Python】使用cwebp、gif2webp、exiftool实现保留exif信息的WebP转换

    import tkinter as tk
    from tkinter import filedialog, messagebox
    from PIL import Image, ImageSequence
    import os
    
    def resize_image(img):
        max_size = 2560
        width, height = img.size
    
        if width > max_size or height > max_size:
            if width > height:
                new_width = max_size
                new_height = int((new_width / width) * height)
            else:
                new_height = max_size
                new_width = int((new_height / height) * width)
            
            img = img.resize((new_width, new_height), Image.LANCZOS)
        
        return img
    
    def convert_to_webp(input_path):
        try:
            file_extension = os.path.splitext(input_path)[1].lower()
            output_path = os.path.splitext(input_path)[0] + ".webp"
    
            if not os.path.exists(input_path):
                raise FileNotFoundError(f"文件 {input_path} 不存在,请检查路径。")
    
            if file_extension == '.webp':
                return f"文件 {input_path} 已是 WebP 格式,无需转换。"
    
            with Image.open(input_path) as img:
                if file_extension in ['.gif'] and getattr(img, "is_animated", False):
                    frames = []
                    durations = []
                    for frame in ImageSequence.Iterator(img):
                        # 处理透明度
                        if frame.mode == "P":
                            frame = frame.convert("RGBA")
                        
                        # 转换帧为 RGBA 并存储
                        new_frame = frame.copy()
                        frames.append(new_frame)
                        durations.append(frame.info.get('duration', 100))
    
                    # 重复最后一帧
                    if len(frames) > 1:
                        durations[-1] = max(durations[-1], 100) 
    
                    # 保存为动态 WebP
                    frames[0].save(
                        output_path,
                        format="WEBP",
                        save_all=True,
                        append_images=frames[1:],
                        duration=durations,
                        loop=img.info.get('loop', 0),  # 循环次数
                        transparency=0,  # 确保透明度保留
                        quality=85
                    )
                else:
                    # 静态图片处理
                    if img.mode == "P":
                        if "transparency" in img.info:
                            img = img.convert("RGBA")
                        else:
                            img = img.convert("RGB")
    
                    img = resize_image(img)
    
                    if img.mode != "RGBA":
                        img = img.convert("RGBA")
    
                    img.save(output_path, format="WEBP", quality=85)
    
            return f"图片已转换并保存为 {output_path}"
        except Exception as e:
            return f"处理文件时发生错误: {e}"
    
    
    def select_files():
        file_paths = filedialog.askopenfilenames(
            title="选择图片文件",
            filetypes=[("所有图片格式", "*.jpg;*.jpeg;*.png;*.gif;*.webp;*.bmp;*.tiff"), 
                       ("JPEG 图片", "*.jpg;*.jpeg"),
                       ("PNG 图片", "*.png"),
                       ("GIF 图片", "*.gif"),
                       ("WebP 图片", "*.webp"),
                       ("BMP 图片", "*.bmp"),
                       ("TIFF 图片", "*.tiff")]
        )
        if file_paths:
            for path in file_paths:
                file_listbox.insert(tk.END, path)
    
    def convert_and_save_batch():
        files = file_listbox.get(0, tk.END)
        if not files:
            messagebox.showerror("错误", "请选择至少一个图片文件!")
            return
    
        results = []
        for file_path in files:
            result = convert_to_webp(file_path)
            results.append(result)
    
        messagebox.showinfo("完成", "\n".join(results))
    
    def clear_list():
        file_listbox.delete(0, tk.END)
    
    root = tk.Tk()
    root.title("批量图片转换为 WebP 工具")
    root.geometry("600x400")
    
    frame = tk.Frame(root)
    frame.pack(pady=10, padx=10, fill=tk.BOTH, expand=True)
    
    scrollbar = tk.Scrollbar(frame, orient=tk.VERTICAL)
    file_listbox = tk.Listbox(frame, selectmode=tk.EXTENDED, yscrollcommand=scrollbar.set)
    scrollbar.config(command=file_listbox.yview)
    scrollbar.pack(side=tk.RIGHT, fill=tk.Y)
    file_listbox.pack(side=tk.LEFT, fill=tk.BOTH, expand=True)
    
    button_frame = tk.Frame(root)
    button_frame.pack(pady=10)
    
    select_button = tk.Button(button_frame, text="选择文件", command=select_files, width=15)
    select_button.grid(row=0, column=0, padx=5)
    
    clear_button = tk.Button(button_frame, text="清空列表", command=clear_list, width=15)
    clear_button.grid(row=0, column=1, padx=5)
    
    convert_button = tk.Button(button_frame, text="批量转换", command=convert_and_save_batch, width=15)
    convert_button.grid(row=0, column=2, padx=5)
    
    root.mainloop()
  • 【自然笔记】通过ECharts建立观鸟图表

    (!该内容目前只做测试,分类未经过严格验证)

    通过模板函数引入ECharts的js,不过这次限制了只有“Echarts”标签的文章加载,避免影响其他界面的加载速度。

    切换图表类型

    效果如上:采用了矩形树图+旭日图,感觉旭日图更加醒目,通过点击标题来切换图表类型。

    <div id="chart-title" style="text-align: center; font-size: 20px; margin-top: 10px; cursor: pointer; color: #007BFF;">
        切换图表类型
    </div>
      document.getElementById('chart-title').addEventListener('click', function () {
                    if (currentOption === 'treemap') {
                        myChart.setOption(sunburstOption);
                        currentOption = 'sunburst';
                    } else {
                        myChart.setOption(treeMapOption);
                        currentOption = 'treemap';
                    }
                });
            });

  • 【WP插件】通过插件形式为WP导入回到顶部功能

    网站此前用的回到顶部按钮是通过插件市场中的插件实现,效果还不错,不过功能比较单一。

    我在其他的博客中看到了一个可以在页面下拉过程中实现当前页面进度的回顶按钮,觉得实用性很棒,因此尝试通过页面脚本的形式导入。

    但是这种方式过于低效,且没法很好自定义,所以便尝试是否可以通过插件的形式导入功能,通过和GPT的一番交流,大致明白了WP插件的制作过程。

    WP的插件可以通过Zip文件导入,其中的结构为:

    backtop/
    ├── assets/
    │ ├── backtop.css
    │ └── backtop.js
    ├── backtop.php
    └── readme.txt (可选)

    其中backtop.php是插件的核心文件,包含了插件的主要功能和初始化代码。

    backtop.css为样式表,js则是JavaScript 文件,写交互逻辑使用。

    参考代码:

    PHP:

    <?php
    /*
    Plugin Name: 写你的插件名称
    Description: 描述
    Version: 版本号
    Author: 作者
    Author URI: https://wanxuefeiyang.cn
    License: GPL2
    */
    
    // Enqueue CSS and JS,注意地址
    function backtop_enqueue_assets() {
        wp_enqueue_style('backtop-style', plugin_dir_url(__FILE__) . 'assets/backtop.css');
        wp_enqueue_script('backtop-script', plugin_dir_url(__FILE__) . 'assets/backtop.js', [], false, true);
    
        $options = get_option('backtop_options');
        wp_localize_script('backtop-script', 'backTopOptions', [
            'position' => $options['position'] ?? 'bottom-right',
            'color' => $options['color'] ?? '#000000',
            'size' => $options['size'] ?? '40px',
            'shape' => $options['shape'] ?? 'circle',
            'margin' => $options['margin'] ?? '20px 20px'
        ]);
    }
    add_action('wp_enqueue_scripts', 'backtop_enqueue_assets');
    
    // 插入 HTML
    function backtop_render_html() {
        echo '
        <div id="backtop-tool">
            <ul>
                <li id="backtop" class="hidden">
                    <span id="backtop-percentage">0%</span>
                </li>
            </ul>
        </div>';
    }
    add_action('wp_footer', 'backtop_render_html');
    
    // 设置页面,可以自定义一些内容
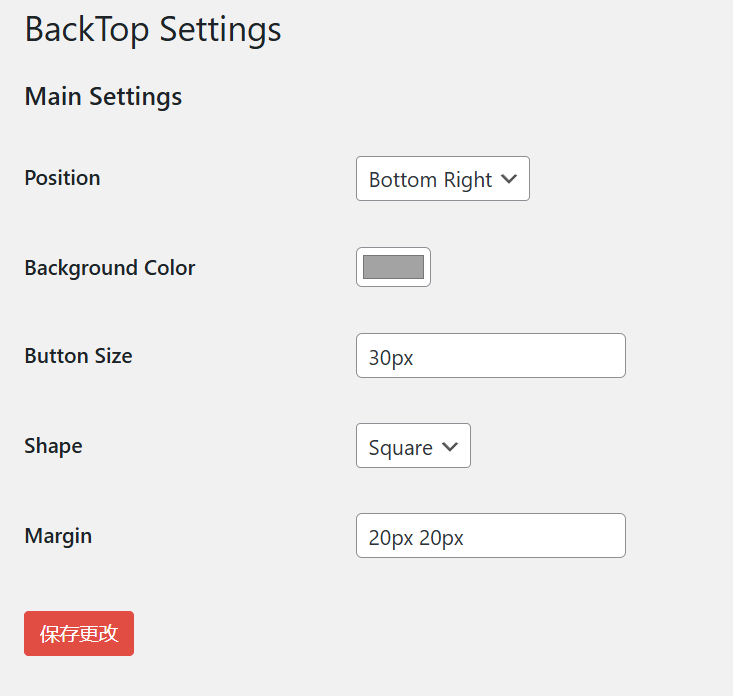
    function backtop_add_settings_page() {
        add_options_page(
            'BackTop Settings',
            'BackTop',
            'manage_options',
            'backtop-settings',
            'backtop_render_settings_page'
        );
    }
    add_action('admin_menu', 'backtop_add_settings_page');
    
    function backtop_render_settings_page() {
        ?>
        <div class="wrap">
            <h1>BackTop Settings</h1>
            <form method="post" action="options.php">
                <?php
                settings_fields('backtop_options_group');
                do_settings_sections('backtop-settings');
                submit_button();
                ?>
            </form>
        </div>
        <?php
    }
    
    function backtop_register_settings() {
        register_setting('backtop_options_group', 'backtop_options', [
            'type' => 'array',
            'sanitize_callback' => 'backtop_sanitize_options',
            'default' => [
                'position' => 'bottom-right',
                'color' => '#000000',
                'size' => '40px',
                'shape' => 'circle',
                'margin' => '20px 20px'
            ],
        ]);
    
        add_settings_section('backtop_main_section', 'Main Settings', null, 'backtop-settings');
    
        add_settings_field('position', 'Position', 'backtop_position_field', 'backtop-settings', 'backtop_main_section');
        add_settings_field('color', 'Background Color', 'backtop_color_field', 'backtop-settings', 'backtop_main_section');
        add_settings_field('size', 'Button Size', 'backtop_size_field', 'backtop-settings', 'backtop_main_section');
        add_settings_field('shape', 'Shape', 'backtop_shape_field', 'backtop-settings', 'backtop_main_section');
        add_settings_field('margin', 'Margin', 'backtop_margin_field', 'backtop-settings', 'backtop_main_section');
    }
    add_action('admin_init', 'backtop_register_settings');
    
    function backtop_position_field() {
        $options = get_option('backtop_options');
        ?>
        <select name="backtop_options[position]">
            <option value="bottom-right" <?php selected($options['position'], 'bottom-right'); ?>>Bottom Right</option>
            <option value="bottom-left" <?php selected($options['position'], 'bottom-left'); ?>>Bottom Left</option>
        </select>
        <?php
    }
    
    function backtop_color_field() {
        $options = get_option('backtop_options');
        ?>
        <input type="color" name="backtop_options[color]" value="<?php echo esc_attr($options['color']); ?>">
        <?php
    }
    
    function backtop_size_field() {
        $options = get_option('backtop_options');
        ?>
        <input type="text" name="backtop_options[size]" value="<?php echo esc_attr($options['size']); ?>" placeholder="e.g., 40px">
        <?php
    }
    
    function backtop_shape_field() {
        $options = get_option('backtop_options');
        ?>
        <select name="backtop_options[shape]">
            <option value="circle" <?php selected($options['shape'], 'circle'); ?>>Circle</option>
            <option value="square" <?php selected($options['shape'], 'square'); ?>>Square</option>
        </select>
        <?php
    }
    
    function backtop_margin_field() {
        $options = get_option('backtop_options');
        ?>
        <input type="text" name="backtop_options[margin]" value="<?php echo esc_attr($options['margin']); ?>" placeholder="e.g., 20px 20px">
        <?php
    }
    
    function backtop_sanitize_options($options) {
        $options['position'] = in_array($options['position'], ['bottom-right', 'bottom-left']) ? $options['position'] : 'bottom-right';
        $options['color'] = sanitize_hex_color($options['color']);
        $options['size'] = preg_match('/^\d+(px|em|%)$/', $options['size']) ? $options['size'] : '40px';
        $options['shape'] = in_array($options['shape'], ['circle', 'square']) ? $options['shape'] : 'circle';
        $options['margin'] = sanitize_text_field($options['margin']);
        return $options;
    }

    JS:

    (function () {
      const backTopTool = document.getElementById("backtop-tool");
      const backTopButton = document.getElementById("backtop");
      const percentageDisplay = document.getElementById("backtop-percentage");
    
      if (backTopTool && backTopButton) {
        const { position, color, size, shape, margin } = backTopOptions || {};
        const [vertical, horizontal] = position.split("-");
        const [marginY, marginX] = margin.split(" ");
        backTopTool.style[vertical] = marginY || "20px";
        backTopTool.style[horizontal] = marginX || "20px";
        backTopButton.style.backgroundColor = color || "#000";
        backTopButton.style.width = size || "40px";
        backTopButton.style.height = size || "40px";
        backTopButton.style.borderRadius = shape === "circle" ? "50%" : "0";
        percentageDisplay.style.fontSize = `${Math.max(parseInt(size) * 0.4, 8)}px`;
      }
    
      const updateScrollProgress = () => {
        const scrollTop = window.scrollY;
        const scrollHeight = document.documentElement.scrollHeight - document.documentElement.clientHeight;
        const scrollPercentage = Math.round((scrollTop / scrollHeight) * 100);
    
        if (percentageDisplay) {
          percentageDisplay.innerHTML = scrollPercentage >= 95 ? "▲" : `${scrollPercentage}%`;
        }
    
        if (backTopButton) {
          backTopButton.classList.toggle("hidden", scrollTop < 200);
        }
      };
    
      const scrollToTop = () => {
        window.scrollTo({ top: 0, behavior: "smooth" });
      };
    
      backTopButton?.addEventListener("click", scrollToTop);
      window.addEventListener("scroll", updateScrollProgress);
    })();

    CSS:

    #backtop-tool {
      position: fixed;
      z-index: 9999;
    }
    
    #backtop-tool ul {
      list-style: none;
      padding: 0;
      margin: 0;
    }
    
    #backtop-tool .hidden {
      display: none;
    }
    
    #backtop-tool li {
      display: flex; 
      justify-content: center; /* 水平居中 */
      align-items: center; /* 垂直居中 */
      width: var(--size, 40px);
      height: var(--size, 40px);
      background: var(--color, rgba(0, 0, 0, 0.7));
      color: #fff;
      border-radius: var(--shape, 50%);
      cursor: pointer;
      font-size: calc(var(--size, 40px) * 0.4); /* 根据按钮大小动态调整字体 */
      text-align: center; /* 对齐数字文本 */
      overflow: hidden;
      box-sizing: border-box;
    }

    管理界面如下:

    从插件制作到实现的过程,给我的感觉是通过插件对页面、功能进行修改,可以避免我们干扰WP核心文件,让页面中的其他功能不受影响,对灵活性、安全性都有一定的增强,这对于我这种半桶水来说非常利好,即便哪里设置错了直接把插件删了就好嘛,可玩性很高。

  • 【HTML】为网站添加WordPress官网飘雪效果

    WordPress官网最近加上了一个飘雪效果,感觉效果相当不错,经过研究后发现他们页面中使用了两个js,而前端只需要用html进行简单调整就可以自定义,可玩性很强。

    我们也可以在自己的网站中使用这个效果,首先在Wordpress官网下载到is-land及snow-fall这俩js。

    通过模板函数对is-land与snow-fall先后加载:

    // js来源自Wordpress官网
    function enqueue_island_assets() {
        wp_enqueue_script(
            'island-js',
            get_template_directory_uri() . '/island.js', 
            true
        );
    }
    add_action('wp_enqueue_scripts', 'enqueue_island_assets');
    wp_enqueue_script(
        'snow-fall-js',
        get_template_directory_uri() . '/snow-fall.js',
        array('island-js'), // 设置依赖
        true
    );

    前端通过html进行调用,我们通过后面的分析可以发现其为前端预留了多个参数调节,比如我想在页面呈现❄飘落,而不是原版的圆点,只需要调整text的值,写成如下即可:

    <is-land on:media="(prefers-reduced-motion: no-preference)" on:idle="">
        <snow-fall mode="page" text="❄"></snow-fall>
    </is-land>

    2025-1-6更新:如果不需要island里面的一些参数,那么直接引入snow-fall也是可以的:

    // island及snowfall的Js文件来自Wordpress官网
    function enqueue_snowfall() {
        wp_enqueue_script(
            'snow-fall-js',
            get_template_directory_uri() . '/snow-fall.js', 
            true
        );
    }
    add_action('wp_enqueue_scripts', 'enqueue_snowfall');
    <snow-fall mode="page" text="❄"></snow-fall>

    目前网站采用直接引入Snow-fall的方式展示。


    后续是源码及一些可以调用的参数信息:

    其中is-land的源码如下:

    class Island extends HTMLElement {
        static tagName = "is-land";
        static prefix = "is-land--";
        static attr = {
            template: "data-island",
            ready: "ready",
            defer: "defer-hydration"
        };
        static onceCache = new Map;
        static onReady = new Map;
        static fallback = {
            ":not(is-land,:defined,[defer-hydration])": (e, t, a) => {
                let n = document.createElement(a + t.localName);
                for (let e of t.getAttributeNames())
                    n.setAttribute(e, t.getAttribute(e));
                let i = t.shadowRoot;
                if (!i) {
                    let e = t.querySelector(":scope > template:is([shadowrootmode], [shadowroot])");
                    if (e) {
                        let a = e.getAttribute("shadowrootmode") || e.getAttribute("shadowroot") || "closed";
                        i = t.attachShadow({
                            mode: a
                        }),
                        i.appendChild(e.content.cloneNode(!0))
                    }
                }
                return i && n.attachShadow({
                    mode: i.mode
                }).append(...i.childNodes),
                n.append(...t.childNodes),
                t.replaceWith(n),
                e.then(( () => {
                    n.shadowRoot && t.shadowRoot.append(...n.shadowRoot.childNodes),
                    t.append(...n.childNodes),
                    n.replaceWith(t)
                }
                ))
            }
        };
        constructor() {
            super(),
            this.ready = new Promise((e => {
                this.readyResolve = e
            }
            ))
        }
        static getParents(e, t=!1) {
            let a = [];
            for (; e; ) {
                if (e.matches && e.matches(Island.tagName)) {
                    if (t && e === t)
                        break;
                    Conditions.hasConditions(e) && a.push(e)
                }
                e = e.parentNode
            }
            return a
        }
        static async ready(e, t) {
            if (t || (t = Island.getParents(e)),
            0 === t.length)
                return;
            let a = await Promise.all(t.map((e => e.wait())));
            return a.length ? a[0] : void 0
        }
        forceFallback() {
            window.Island && Object.assign(Island.fallback, window.Island.fallback);
            for (let e in Island.fallback) {
                let t = Array.from(this.querySelectorAll(e)).reverse();
                for (let a of t) {
                    if (!a.isConnected)
                        continue;
                    let t = Island.getParents(a);
                    if (1 === t.length) {
                        let n = Island.ready(a, t);
                        Island.fallback[e](n, a, Island.prefix)
                    }
                }
            }
        }
        wait() {
            return this.ready
        }
        async connectedCallback() {
            Conditions.hasConditions(this) && this.forceFallback(),
            await this.hydrate()
        }
        getTemplates() {
            return this.querySelectorAll(`template[${Island.attr.template}]`)
        }
        replaceTemplates(e) {
            for (let t of e) {
                if (Island.getParents(t, this).length > 0)
                    continue;
                let e = t.getAttribute(Island.attr.template);
                if ("replace" === e) {
                    let e = Array.from(this.childNodes);
                    for (let t of e)
                        this.removeChild(t);
                    this.appendChild(t.content);
                    break
                }
                {
                    let a = t.innerHTML;
                    if ("once" === e && a) {
                        if (Island.onceCache.has(a))
                            return void t.remove();
                        Island.onceCache.set(a, !0)
                    }
                    t.replaceWith(t.content)
                }
            }
        }
        async hydrate() {
            let e = [];
            this.parentNode && e.push(Island.ready(this.parentNode));
            let t = Conditions.getConditions(this);
            for (let a in t)
                Conditions.map[a] && e.push(Conditions.map[a](t[a], this));
            await Promise.all(e),
            this.replaceTemplates(this.getTemplates());
            for (let e of Island.onReady.values())
                await e.call(this, Island);
            this.readyResolve(),
            this.setAttribute(Island.attr.ready, ""),
            this.querySelectorAll(`[${Island.attr.defer}]`).forEach((e => e.removeAttribute(Island.attr.defer)))
        }
    }
    class Conditions {
        static map = {
            visible: Conditions.visible,
            idle: Conditions.idle,
            interaction: Conditions.interaction,
            media: Conditions.media,
            "save-data": Conditions.saveData
        };
        static hasConditions(e) {
            return Object.keys(Conditions.getConditions(e)).length > 0
        }
        static getConditions(e) {
            let t = {};
            for (let a of Object.keys(Conditions.map))
                e.hasAttribute(`on:${a}`) && (t[a] = e.getAttribute(`on:${a}`));
            return t
        }
        static visible(e, t) {
            if ("IntersectionObserver"in window)
                return new Promise((e => {
                    let a = new IntersectionObserver((t => {
                        let[n] = t;
                        n.isIntersecting && (a.unobserve(n.target),
                        e())
                    }
                    ));
                    a.observe(t)
                }
                ))
        }
        static idle() {
            let e = new Promise((e => {
                "complete" !== document.readyState ? window.addEventListener("load", ( () => e()), {
                    once: !0
                }) : e()
            }
            ));
            return "requestIdleCallback"in window ? Promise.all([new Promise((e => {
                requestIdleCallback(( () => {
                    e()
                }
                ))
            }
            )), e]) : e
        }
        static interaction(e, t) {
            let a = ["click", "touchstart"];
            return e && (a = (e || "").split(",").map((e => e.trim()))),
            new Promise((e => {
                function n(i) {
                    e();
                    for (let e of a)
                        t.removeEventListener(e, n)
                }
                for (let e of a)
                    t.addEventListener(e, n, {
                        once: !0
                    })
            }
            ))
        }
        static media(e) {
            let t = {
                matches: !0
            };
            if (e && "matchMedia"in window && (t = window.matchMedia(e)),
            !t.matches)
                return new Promise((e => {
                    t.addListener((t => {
                        t.matches && e()
                    }
                    ))
                }
                ))
        }
        static saveData(e) {
            if ("connection"in navigator && navigator.connection.saveData !== ("false" !== e))
                return new Promise(( () => {}
                ))
        }
    }
    "customElements"in window && (window.customElements.define(Island.tagName, Island),
    window.Island = Island);
    export {Island, Island as component};
    export const ready = Island.ready;

    通过前端代码调用:

    <is-land on:media="(prefers-reduced-motion: no-preference)" on:idle="" ready="">
    <snow-fall mode="page"></snow-fall>
    </is-land>

    其中可以定义:

    on:media:当满足媒体查询条件时加载内容。

    on:idle:在浏览器空闲时间或页面完全加载后执行。

    on:visible:当标签内容滚动到视口中时加载。

    on:interaction:在用户交互(如点击、触摸)后加载。

    on:save-data:根据设备的省流量模式决定是否加载内容。

    对于snow-fall.js,源码如下:

    class Snow extends HTMLElement {
        static random(t, e) {
            return t + Math.floor(Math.random() * (e - t) + 1)
        }
        static attrs = {
            count: "count",
            mode: "mode",
            text: "text"
        };
        generateCss(t, e) {
            let n = [];
            n.push('\n:host([mode="element"]) {\n\tdisplay: block;\n\tposition: relative;\n\toverflow: hidden;\n}\n:host([mode="page"]) {\n\tposition: fixed;\n\ttop: 0;\n\tleft: 0;\n\tright: 0;\n}\n:host([mode="page"]),\n:host([mode="element"]) > * {\n\tpointer-events: none;\n}\n:host([mode="element"]) ::slotted(*) {\n\tpointer-events: all;\n}\n* {\n\tposition: absolute;\n}\n:host([text]) * {\n\tfont-size: var(--snow-fall-size, 1em);\n}\n:host(:not([text])) * {\n\twidth: var(--snow-fall-size, 10px);\n\theight: var(--snow-fall-size, 10px);\n\tbackground: var(--snow-fall-color, rgba(255,255,255,.5));\n\tborder-radius: 50%;\n}\n');
            let o = {
                width: 100,
                height: 100
            }
              , a = {
                x: "vw",
                y: "vh"
            };
            "element" === t && (o = {
                width: this.firstElementChild.clientWidth,
                height: this.firstElementChild.clientHeight
            },
            a = {
                x: "px",
                y: "px"
            });
            for (let t = 1; t <= e; t++) {
                let e = Snow.random(1, 100) * o.width / 100
                  , s = Snow.random(-10, 10) * o.width / 100
                  , i = Math.round(Snow.random(30, 100))
                  , l = i * o.height / 100
                  , r = o.height
                  , h = 1e-4 * Snow.random(1, 1e4)
                  , d = Snow.random(10, 30)
                  , m = -1 * Snow.random(0, 30);
                n.push(`\n:nth-child(${t}) {\n\topacity: ${.001 * Snow.random(0, 1e3)};\n\ttransform: translate(${e}${a.x}, -10px) scale(${h});\n\tanimation: fall-${t} ${d}s ${m}s linear infinite;\n}\n\n@keyframes fall-${t} {\n\t${i}% {\n\t\ttransform: translate(${e + s}${a.x}, ${l}${a.y}) scale(${h});\n\t}\n\n\tto {\n\t\ttransform: translate(${e + s / 2}${a.x}, ${r}${a.y}) scale(${h});\n\t}\n}`)
            }
            return n.join("\n")
        }
        connectedCallback() {
            if (this.shadowRoot || !("replaceSync"in CSSStyleSheet.prototype))
                return;
            let t, e = parseInt(this.getAttribute(Snow.attrs.count)) || 100;
            this.hasAttribute(Snow.attrs.mode) ? t = this.getAttribute(Snow.attrs.mode) : (t = this.firstElementChild ? "element" : "page",
            this.setAttribute(Snow.attrs.mode, t));
            let n = new CSSStyleSheet;
            n.replaceSync(this.generateCss(t, e));
            let o = this.attachShadow({
                mode: "open"
            });
            o.adoptedStyleSheets = [n];
            let a = document.createElement("div")
              , s = this.getAttribute(Snow.attrs.text);
            a.innerText = s || "";
            for (let t = 0, n = e; t < n; t++)
                o.appendChild(a.cloneNode(!0));
            o.appendChild(document.createElement("slot"))
        }
    }
    customElements.define("snow-fall", Snow);
    

    其定义了一个自定义 HTML 元素 <snow-fall>,用于实现落雪效果。

    我们可以通过改变js中的一些数值来变更效果,例如

    static attrs = { count: “count”, mode: “mode”, text: “text” };

    count:雪花的数量,默认值是 100。

    mode:两种模式:

    1、element:作用于某个特定元素。

    2、page:覆盖整个页面。

    text:雪花的文本内容(默认为空,显示为圆形点)。

    page模式目前已经满足使用,如果想使用element模式目前似乎会出现firstElementChild 为空或未能正确获取其 clientWidth,导致 generateCss 方法出错。如何正确使用element模式还需要探究。

    通过 generateCss(t, e) { 动态生成CSS,可以定义:

    1、:host([mode=”element”]) 和 :host([mode=”page”]) 用于适配不同模式。

    2、雪花的大小由 –snow-fall-size 决定,颜色由 –snow-fall-color 决定。

    动态生成每个雪花的动画样式:

    1、起始位置:translate(${e}${a.x}, -10px)

    2、随机透明度:opacity

    3、动画时长:animation: fall-${t} ${d}s ${m}s linear infinite;

    4、动画帧 @keyframes: 中间位置:随机 x 偏移,随机 y 偏移。最终位置:完全落到底部。

  • 【全景图】大疆球形全景合成2:1全景图(等距柱状投影)

    前言:

    全景平台普遍要求提供2:1的等距柱状投影全景图,而大家使用一些老款无人机拍摄的全景图可能没有机内合成功能,比如mini2之类的,因此我们需要一些手段将其进行转换与合成。(目前一些新款无人机都可以直接机内合成了,不过也可以用这个方法,把一些合成有问题的重新做一下编辑。)

    网络上的教程普遍基于PTGui,该软件好用易用且可以很方便的补天。不过该软件是付费软件,虽然可以进行破解,但有没有开源的软件可以进行制作?

    当然有,我们可以使用开源的全景合成软件—— Hugin 对全景图进行合成。

    用到的软件:Hugin(合成)、Photoshop(补天)。

    点击快速跳转步骤:

    步骤:

    1、导入大疆全景图片

    Hugin有三个用户界面,后两个涉及一些复杂操作,我推荐使用第一个简单界面来导入与修正图片。

    直接点击加载图片,选择大疆全景图文件夹,将全景图片全选导入。

    你会看到载入的图片犬牙交错,导入成功后我们可以进入下一步骤。

    2、分析图片,创建2:1全景图,调整轴心

    点击排列,软件会启动脚本,分析各个图片的关联,创建相应的控制点。

    该过程需要耗费一定的时间。

    等待脚本运行完毕,我们可以在预览界面看到排列完成的图片。

    其中的天空有一大片空缺,这里先不用管,因为无人机拍摄时候确实没法向上拍摄,这里的补天我们可以通过PS中的一个简单步骤实现。

    另外,这里需要注意的是我们需要提前指定全景图片的三轴,可以在移动工具中,拖动左侧的全景球来指定相应轴心位置。

    3、导出全景图

    接下来我们导出2:1的全景图。如果直接点击创建全景图像,你会发现分辨率是不对的,因此我们切换界面,使用高级功能导出。

    点击高级界面。

    可以看到全景图的控制点等已经创建完毕,其他的不用动,我们点击该界面的缝合器。

    投影确认是等矩形。然后我们点击计算优化尺寸。

    这时尺寸会重新计算,得到我们需要的足够清晰的输出尺寸。

    点击缝合按钮,脚本开始运行,这时软件会创建一个PTO项目文件,以及多个TIF文件,最终会输出一张合并完成的TIF全景图片文件。

    而后我们对缺失的天空部分进行填充。

    4、补天

    将图片导入Photoshop,使用选区工具框选缺失部分及周围部分天空。

    使用填充工具,对空缺部分进行填充。

    在此过程中我们还可以对图片进行一些色彩调整,完成后导出,我们就得到了一个很棒的2:1全景图,而后可以将其导入到其他全景平台进行内容制作。

    5、效果展示

    此处若出现跨域问题,则需要修改Nginx的配置文件,对类型图片进行请求放行。

    这个全景效果使用了pannellum.js,可以很方便置入网站来进行展示。

    <script src="https://cdn.jsdelivr.net/npm/pannellum/build/pannellum.js"></script>
        <link rel="stylesheet" href="https://cdn.jsdelivr.net/npm/pannellum/build/pannellum.css">
        <style>
            #panorama {
                width: 100%;
                height: 500px;
            }
        </style>
    </head>
    <body>
        <div id="panorama"></div>
        <script>
            pannellum.viewer('panorama', {
                "type": "equirectangular",
                "panorama": "xxx.jpg", // 图片地址
                "autoLoad": true,
                "compass": true // 显示指南针
            });
        </script>
    </body>

  • 【网站】为WordPress启用持久对象存储(Redis及Memcached)

    一、服务器为Debian、采用PHP,使用Redis:

    1、安装Redis:

    apt install redis-server

    2、检查Redis状态

    systemctl status redis-server

    3、一切无误后,启用插件进行管理,推荐使用插件——Redis Object Cache,配置完成后即可实现启用持久对象存储。

    如果想使用 Object Cache Pro,则需要配置PHP Redis,在此不详述,对一般网站和用户来说Redis Object Cache已经足够。


    二、服务器为Debian、采用PHP,使用Memcached:

    1、安装Memcached:

    apt install memcached libmemcached-tools

    2、安装Memcached PHP 扩展

    apt install php-memcached

    检查扩展是否成功安装:

    php -m | grep memcached 

    检查Memcached状态:

    systemctl status memcached

    检查端口状态:

    netstat -plntu | grep memcached

    3、一切无误后,启用插件进行管理,这是由于PHP版本持续更新,而网上的一些WordPress 对象缓存文件并不能对最新版本的PHP完美兼容,因此推荐使用 W3 Total Cache插件进行启用,配置完成后即可实现启用持久对象存储。

  • 【网站】为网站添加公益404页面

    目前腾讯公益提供了一个可以自动更新内容的JS,可以为404页面自动更新公益内容,代码如下:

    <script src="https://volunteer.cdn-go.cn/404/latest/404.js"></script>

    我们可以直接使用自定义HTML插入到404页面中。

    <style>
      #404DlV {
        width: 100%;
        height: 100%; 
      }
    </style>
    <div id="404DlV"></div>
    <script src="https://volunteer.cdn-go.cn/404/latest/404.js" rendertarget="404DlV"></script>

    点击跳转到腾讯提供的公益404模板页面

  • 【网站】WordPress使用Google Analytics代码的简单方法

    写在前面:谷歌分析会被浏览器的反广告和反追踪插件屏蔽,因此搜集到的数据可能有很大缺失。

    方法一:通过页眉+自定义HTML实现

    一般的网站页眉部分是统一的,如果不是的话,可以设置一个统一的空白的页眉,只需要将Google Analytics提供的script代码以HTML区块的方式粘贴到页眉部分即可全站启用,并为全站提供分析代码。

    方法二:通过模板函数实现(更推荐)

    使用类似的代码,插入到主题模板函数中,这样可以直接在Header中进行加载。

    // Function to add Google Analytics
    function add_google_analytics() {
        ?>
    <!-- Google tag (gtag.js) -->
        <script async src="https://www.googletagmanager.com/gtag/js?id=GA_TRACKING_ID"></script> // 替换你的ID
        <script>
          window.dataLayer = window.dataLayer || [];
          function gtag(){dataLayer.push(arguments);}
          gtag('js', new Date());
          gtag('config', 'GA_TRACKING_ID'); // 替换你的ID
        </script>
        <!-- End Google Analytics -->
        <?php
    }
    add_action('wp_head', 'add_google_analytics');